|
|
Guitar Lessons by Aaron Schulman
|
|
|
Lesson 4: Chording the Guitar: A, Am, E, Em
|
|
|
How to chord these chords and a few variations
|
|
In previous lessons, we learned about the anatomy of the acoustic guitar, how to hold and strum the guitar, and then how to chord some commonly used chords, G, C and D. Now we will learn some other very common chords, A, Am, E, Em, and a few variations. The “m” next to a chord means “minor” and you will see it a lot in various music.
Variations are good to learn because depending on the song and the key you might be playing, certain variations are actually easier to use when switching to certain chords. It's good to get the basics and also learn other variations to be able to play a wider selection of songs.
Remember, for a right handed player, the left hand chords the strings and the right hand strums for most basic rhythm acoustic guitar playing. Also remember that the thumb and fingers are numbered on the left hand for identification on the chord charts or tabs. The thumb is a “T” and the fingers are numbered 1 – 2 – 3 and 4 starting with the index (pointer) finger and moving toward the smallest (pinky) finger.
|
|
|
|
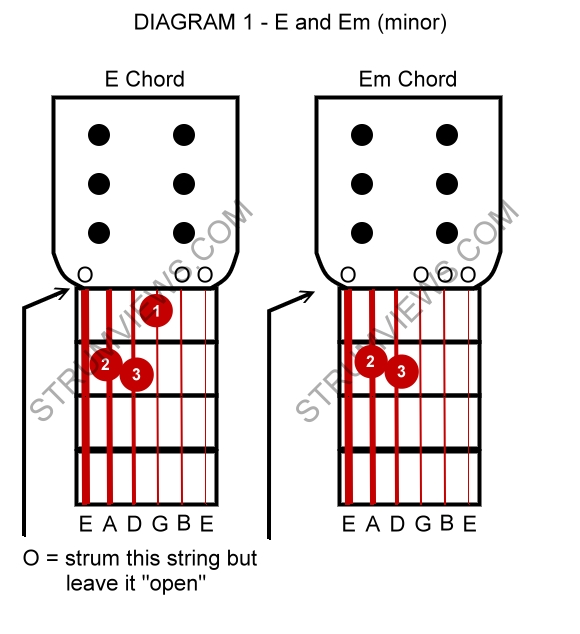
To chord an E and Em (minor), see diagram 1. Remember that an “X” over a string means “do not strum” as it does not fit the chord and an “O” over the string means “strum the string but leave it open”. These are standard tablature markings and are universal for guitar chording charts. Switching between E and Em is fairly simple in this form because all you have to do is raise finger 1 (index finger) for the E minor and place it back down to switch to the E chord (as long as fingers 2 and 3 are correctly placed on the frets).
|
|
|
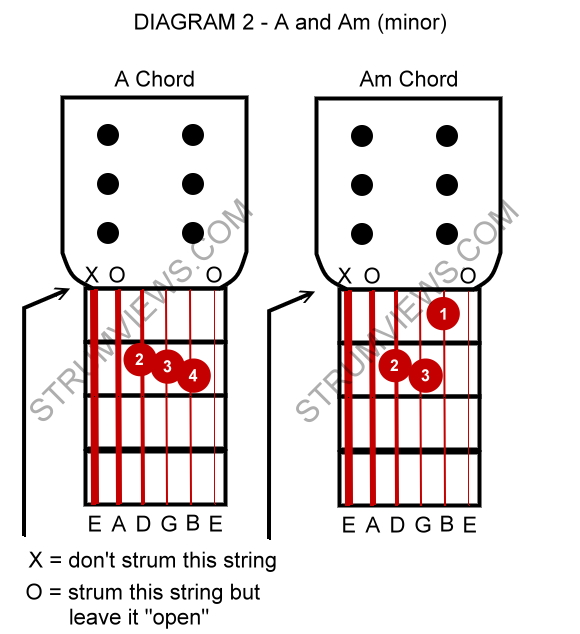
To chord an A and Am (minor) see diagram 2. Switching between these two forms of A and A minor on the acoustic or electric guitar is almost as simple as switching between E and E minor with a few subtle differences. In diagram 2 for the acoustic or electric guitar, notice that the Am chord is just like the E chord in diagram 1, except that in Am the fingers are all “bumped” 1 string closer to string #1 (the thinnest E string which also is the closest string to the floor). Switching between A and Am in these forms is also fairly simple. Notice in diagram 2 that fingers number 2 and 3 do not change positions (they are still on the same strings on the same frets). For A, you place finger # 4 onto the second string at the second fret and it does not matter if finger #1 is placed or not, as long as it does not buzz string # 1 or # 6. For Am, all you do is place finger # 1 on the second string at the first fret and finger # 4 must be lifted.
|
|
|
|
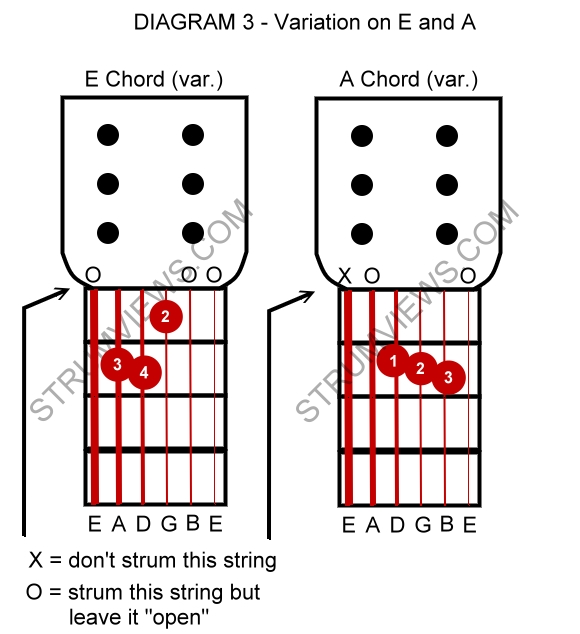
To chord variations of A and E see diagram 3. The E chord can also be chorded on an acoustic guitar using fingers 2 -3 – 4 . Compare the difference between E in this diagram and E in diagram 1. Also, it is fun to slide the E chord form up and down the frets and strum. Have fun and experiment with this as you will discover a few different forms of the E chord. Also, compare the A chord in diagram 3 with the A chord in diagram 2. Practice both variations of A as well.
Keep practicing the strumming every day that you can, and continue practicing your switching between all of the chords you have learned so far. At first, sometimes it is easiest to practice chording and switching apart from strumming. As you get better, it will become easier to practice both in unison (together).
|
|
|
In the next lesson, we will be learning about putting some of these E and A forms into a more difficult but important kind of chord called the “bar chord” or “barre chord”.
This lesson series on the beginner acoustic guitar have been provided by Aaron Schulman, an avid guitar player since 1990. He is happily married with 3 daughters and builds websites. Before purchasing a guitar, be sure to read his acoustic guitar reviews at strumviews.com
The Making of the Constitution and the Foundation of the U.S. Legal System and Government
Part 1 Part 2
Part 3
Safety Tips for Fun Family Travel
|
|
