|
|
Now that you have begun to work on basic finger scaling exercises, it is important to learn how to be able to scale the chording hand fingers in both directions. In this next lesson, we will take a basic exercise and reverse the order on the acoustic guitar so that your fingers can learn to work upwards on scales as well as in reverse. These activities also work equally as well on the electric guitar. Whether you are a beginner or intermediate acoustic guitar player, these kinds of activities are used by many professionals to keep the fingers, the mind, and the picking cadence in coordination with each other. These exercises are also used to warm up and cool down for many accomplished players, and serve as the foundation for learning to play scales on the acoustic guitar, as well as improvisation and coordination techniques. In all of your practice, be sure to balance chording, strumming, finger picking and scales to be more rounded in becoming the best entry level acoustic guitar player you can be.
Remembering the previous lesson
For our first lesson on learning basic scale exercises for the acoustic guitar, we focused on one string and 4 consecutive frets, while working up the string on these 4 frets, over and over to produce accuracy. Speed is secondary and will always improve if accuracy and coordination and careful timing are the focus during scale practice, or any practice on the acoustic guitar. Remember to focus on hitting all of the notes cleanly and consistently with the steady beat of a metronome at first to produce a sense of good internal timing. We are now going to take this upward scale used in the previous lesson and work it backwards.
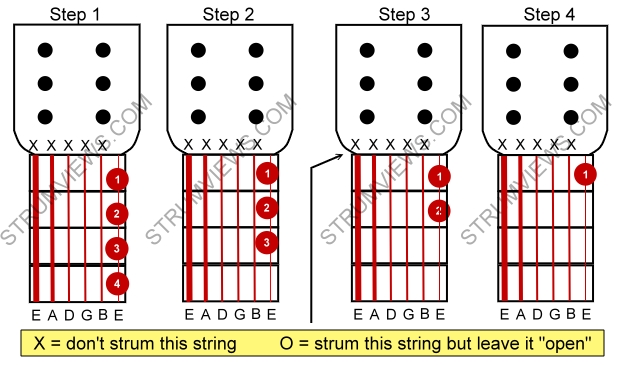
Begin by selecting any string on the acoustic guitar. Now, place your four chording fingers consecutively on frets 1-2-3-4 with fingers 1-2-3-4 in a line without skipping frets. If you want to start on a higher fret because for comfort or convenience, or because the distance between frets is smaller and easier to cover, that is fine too. The key is to do what you can to keep from getting frustrated while focusing on the accuracy of playing the scales.
Start with a very slow tempo by tapping your foot evenly, listening to the tick of a clock or using a metronome if you have one. You can start this exercise with just the left hand if you are not comfortable coordinating both the chording hand and the picking hand. Now, with each beat, pull one finger off of the string starting with finger 4, and working your way down. Be sure to pull it straight off, perpendicular to the fingerboard or fretboard so as not to cause the string to be plucked sideways by the scaling hand. This technique, by plucking sideways on a string with the chording hand fingertips is called “hammer-off” and is an actual technique used for more intermediate or advanced playing, as well as in finger-tapping styles of advanced playing, and is not the focus of this lesson as it will produce additional notes that will interfere with the cleanliness of this scaling technique. Count, 1-2-3-4 while pulling fingers off consecutively, 4-3-2-1 while trying to produce little to no sound. If you are able to produce little to no sound, you have done it accurately.
Now, introduce the picking hand with the flat pick. If you are unable to alternatively pick down-up-down-up on one string with the pick yet, then you can focus on picking consecutively down four times and then up four times in a row, until you are able to master alternating down-up-down-up with the pick comfortably and cleanly. Try to work on timing as you pick. Pick down-up-down-up while pulling fingers off of the same string with each consecutive pick so that the first downward pick is performed with all 4 fingers on the string, the second upward pick is performed with the 4th finger removed, the third pick is then downward again with both the 3rd and 4th fingers removed, and the final upward pick (the 4th pick in the 4 part cycle) is picked with only the index finger or first finger remaining on the string. Immediately place all 4 fingers back on the string, and continue repeating this 4-step scaling pattern over and over. Again, focus on accuracy and producing a clean sound that is in timing with the tempo as well as well coordinated, so that the pick of the string is done a split second after each successive fingertip change on the chording hand.
|
|