|
|
Guitar Lessons by Aaron Schulman
|
|
|
Lesson 2: How to hold and strum
your guitar
|
|
|
This is where the fun
begins (and perhaps a little frustration, but be patient). It may take a few months to build up some
strength in your cording hand, and perhaps a little bit of callousness on your
fingertips, but stick with it and you'll be strumming songs in no time!

|
|
First, in order to
strum, you will need a pick. Pics come in all kinds of colors and materials, from thin
and flexible to hard and rigid. So
before getting too technical with all the variations in picks out there, just
get a few medium plastic picks to start (or a variety). With experience, you may find you like your
picks a little heavier or a little more thin.
What's most important to
begin is that you practice regularly, build up some strength in your hands and
fingers, and don't give up. The most
difficult time to learn to play guitar is the first few months.
|

|
|
Step 1:
Holding the pick
Holding the pick with
the correct grip and pressure is essential.The best way to hold a pick is to start with what is standard, and learn
to adjust it to your playing style as you become more advanced.If you hold the pick with a lot of finger and
thumb on it, you will not have to apply very much pressure.Adding too much pressure will create tension
in the hand and arm, and make strumming more stiff and less smooth (affecting
the tone quality)
If you are right handed, hold your right hand in front of you, curl your index finger and straighten your other 3 digits (see the diagram A). With your other hand, place the pick against your curled finger so it points slightly away from the back of your hand (see diagram B). Then lightly place your thumb over the pick comfortably to trap the pick (but don't add too much tension). The friction of the thumb and curled index finger should be sufficient to hold the pick with light pressure.
|
Step 2: Holding the guitar
Now, be sure you are seated at first. You can learn to hold and strum the guitar with a strap later, as they posture is slightly different. Lay the guitar with the sound hole facing away from you, with the body resting on your right leg, having the neck and head aiming up across the direction of your left shoulder. Now grab the neck lightly with your left hand making sure your wrist is not bent too much (see diagram C). No need to finger any chords right now. Just hold the guitar so your left hand is not touching or muting any strings. We're just going to strum a bit.
|
|

|
|
|
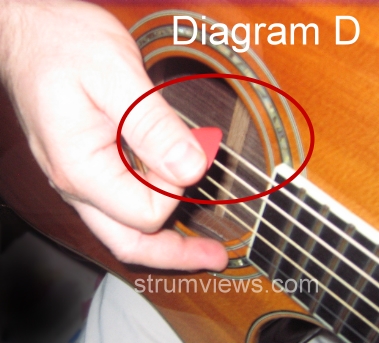
Step 3: The Strum! (downward strum)
Now, once you are fairly comfortable, take your right hand and forearm and place the pick lightly on the thickest string (the Low E String). It should be the string closest to the ceiling. Lay the pick so that it leans slightly toward the floor (not 90 degrees to the string, but at a downward angle. See Diagram D) Now, smoothly slide the pick toward the floor strumming all 6 strings by rotating your right arm at the elbow (not the wrist). Your hand, wrist and arm should be relaxed and never rigid.
Congratulations! You just strummed! Don’t be too concerned about the sound quality right now. It will improve with time as you develop a feel for the strumming technique.
|
Step 4: The Strum! (upward strum)
Now, to follow through with an upward strum, start on the skinniest string (the one closest to the floor) and strum toward the ceiling, with the axis or rotation happening at your elbow. Your bicep on your right arm should rest gently on the guitar body the entire time, while your elbow acts as the pivot point. The pick should angle downward slightly toward the floor and your grip should remain soft (not rigid).
Step 5: Practice, Practice, Practice.
The next thing to do is to practice downward strums and upward strums until your sound becomes smooth and soft. Eventually, both downward strums and upward strums should sound equally smooth and clean with time. At the beginning, you can practice strumming just the downward strum by listening to a clock tick or a metronome if you have one and simply strum down with each tick while counting:
1 - 2 - 3 - 4- 1- 2- 3 -4 (repeatedly)
Also, you can practice the upward strums with the same tempo and meter as the upward strum above.
Once you feel fairly comfortable with both upward and downward strums, you can begin working on eight-note strums on this same tempo and meter. The downward strums will strum on the numbers, and the upward strums will strum on the “ands” as you count like this:
1 - and - 2 - and - 3 - and - 4 - and (repeatedly)
Keep it up! The more you practice your strumming, the more consistent and fluid it will sound.
Now that you are learning to strum, you are ready for your next lesson: Learning basic guitar chords.
This lesson was provided by Aaron from Aimadvantage.com, a web design company in Ohio. If you are a beginner or intermediate player considering buying a guitar, he suggests first reading his review on beginner acoustic guitars on strumviews.com.
The Making of the Constitution and the Foundation of the U.S. Legal System and Government
Part 1 Part 2
Part 3
Safety Tips for Fun Family Travel
|
|
|
