|
|
Guitar Lessons by Aaron Schulman
|
|
|
Lesson 3: Chording the Guitar: G, C, and D
|
|
|
How to chord 3 of the most common guitar chords
|
|
In lesson 1, we learned about the anatomy of a guitar. In lesson 2 we learned how to hold and strum a guitar. In this next lesson, we will learn how to chord some common chords used in many guitar songs. We'll begin with some of the most widely used and basic chords, and in later lessons we will focus on more complex chords.
Don't get discouraged. The first few months while learning a guitar can be the most challenging. Your chording hand and fingers can hurt and the sound might not be very smooth. Hang in there and be patient with yourself and persevere. In a few months, you will be strumming many songs if you invest at least ½ hour a day to practicing chords, practicing your strumming, and building strength and muscle memory.
|
|
|
|
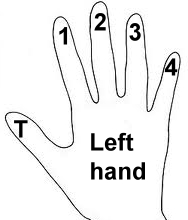
To begin learning chords, we must first number the fingers on the chording hand as guitar chords are learned on charts called “tabs” or tablature. The tabs represent the frets, strings and finger placement on the guitar frets and strings. We will refer to a right-handed player, but for a left-handed player, just reverse the hands! A right handed player forms chords with his or her left hand while strumming or picking with his or her right hand. The left hand will be numbered starting with the thumb and moving toward the small finger (T – 1 – 2 – 3 – 4) Please see diagram of the left hand.
|
|
|
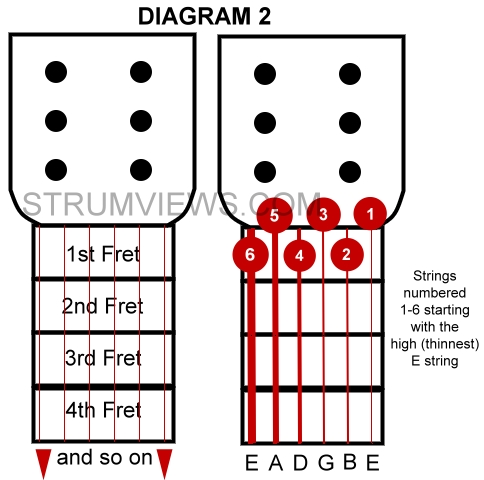
The chord chart or tabs are made to resemble the guitar neck with frets and strings (see lesson 1 if you forget what frets, neck and strings refer to). The frets are numbered from 1 through 18 and start with the first fret at nearest the head or nut of the guitar. The numbers increase as you move toward the body of the guitar. The strings are numbered from 1 to 6: with 1 being the thinnest E string and 6 being the thickest E string. The standard tuning for the strings from 1 to 6 are: E – B – G – D – A – E. (please see diagram 2)
We'll start with 3 basic chords, G, D and C (all major chords).
|
|
|
|
When chording, you only want the fingertips of the chording hand to touch the string it is associated with. It also must apply enough pressure against the string so that the chord is made. If the pressure is not strong enough, or if fingers are brushing against strings they are not supposed to touch, you will either mute the strings or get an unfavorable buzz sound. When chording, you'll want to curl your fingers as if you are holding a small egg in the chording hand. This will help keep the fingertips from touching other strings.
|
|
|
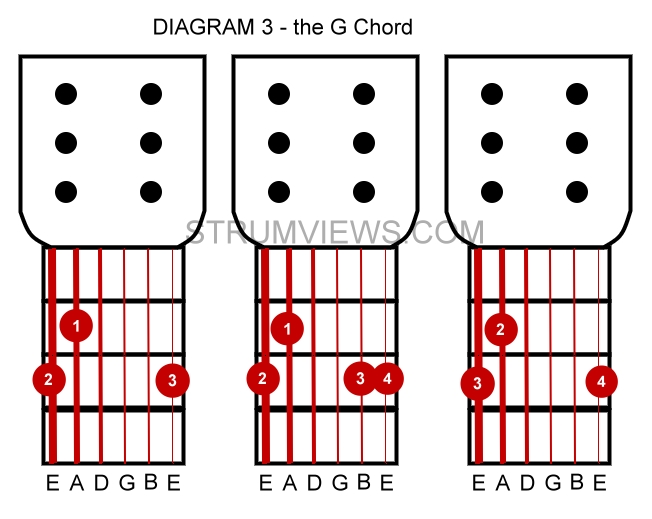
The G (major) chord uses fingers 1-2-3, or 1-2-4 or 1-2-3-4 and has many variations as you move up the neck. We'll start with the most commonly used forms of G. Press the string firmly into the fret boards and strum. (see diagram 3)
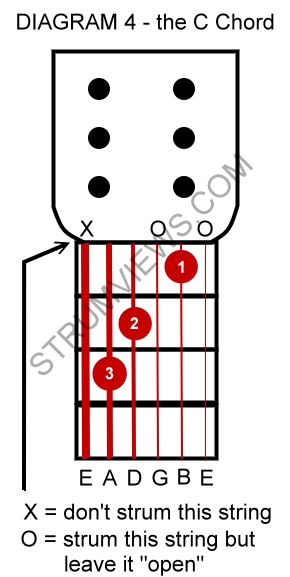
The C (major) chord uses 1-2-3 and has many variations as well. Try chording C firmly and strum. (see diagram 4)
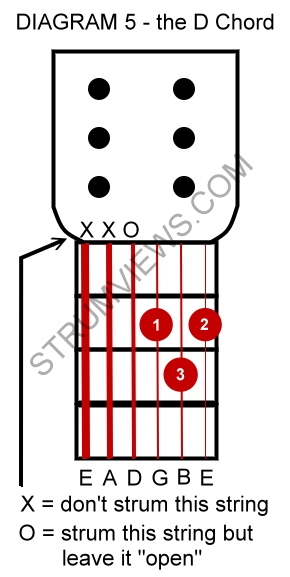
The D (major) chord uses fingers 1 – 2 – 3 and also has many variations. Try chording D and strum. (see diagram 5)
|
|
|
|
Congratulations! You just strummed your first 3 chords. Regardless of the sound quality. Stick with it. Also, begin practicing switching from G to C to D and back until it becomes second nature. At first, it will be a slow process. As you continue doing switching exercises (you don't need to strum to do these), you will get faster and better at changing chords. Keep practicing and get ready for the next lesson on guitar chords.
|
|
|
This lesson was provided by Aaron Schulman, owner of the web design company, AimAdvantage.com and publisher of several websites including strumviews.com, a website devoted to guitar reviews and more. He has been an avid musician since 1984 and guitar player since 1990. Before purchasing your first guitar, read through his reviews and guides to ensure that you buy the best beginner acoustic guitar.
The Making of the Constitution and the Foundation of the U.S. Legal System and Government
Part 1 Part 2
Part 3
Safety Tips for Fun Family Travel
|
|
